Adding Columns to the Listing Layout
The listings within MEX are often all one needs by standard in regards to the information they display, however sometimes users require specific information. Within MEX it is possible to later the default listing layouts through the Add Listing Layout feature, which allows you to either add some pre-existing columns, or script your own in.
This can be done in any areas of MEX with a listing such as the Work Order Listing, Requests Listing, Preventative Maintenance Listing, Purchase Order Listing, and so on. All it requires is initially navigating to the exact listing you wish to do this for.
Adding Non-Standard Columns
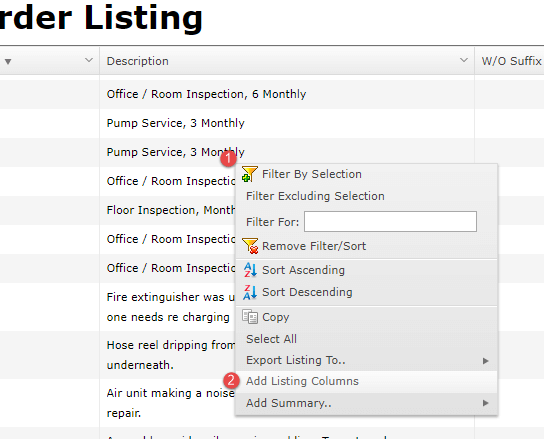
To add columns not in the Default listing right-click in the body of the listing to bring up the listing’s pop-up menu and select "Add Listing Columns" to display the "Configure Columns" screen.

The menu that appears when right clicking a listing (1) – then selecting Add Listing Columns (2)
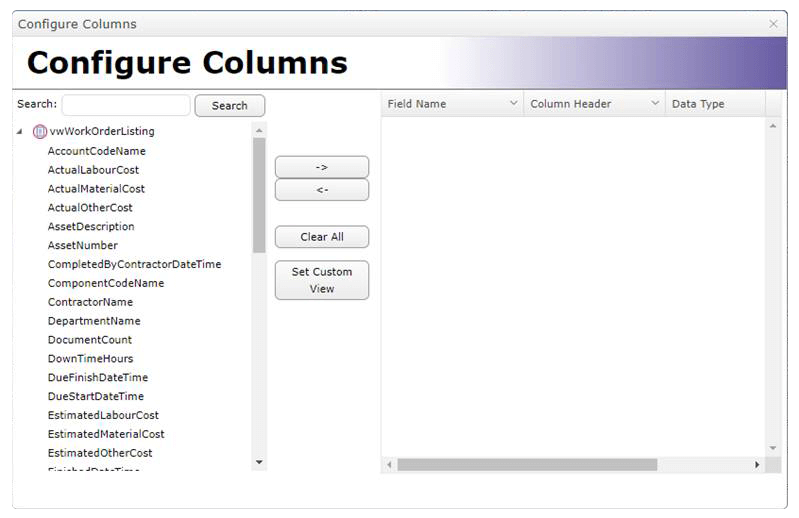
This screen is broken up into two panes; the left-hand pane contains a list of the fields that are available for inclusion in the listing while the right-hand pane shows a list of the non-standard columns that have been added. Columns are added to the Listing by selecting them in the left-hand pane and clicking on the "->" button to move them across.

The Configure Columns window with the two aforementioned columns
Once you have moved a field across to the right-hand listing you can:
- Change the name of the column by editing the "Column Header" field in the right-hand listing.
- Change the format that the column is displayed in with the "Data Type" drop-down in the right-hand listing.
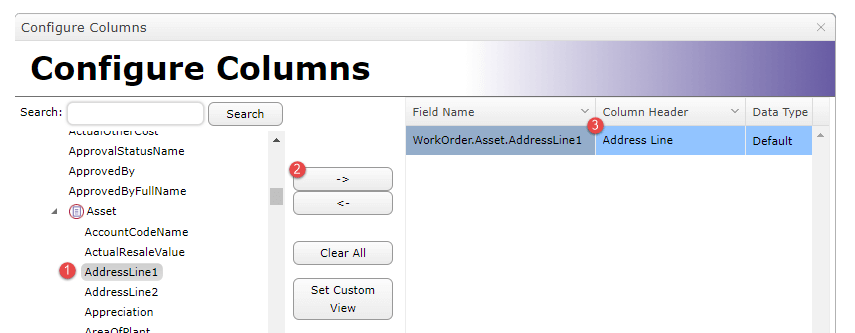
The listing of available fields is a hierarchical list which means that you may have to move down the nested listing to get to the field that you want. For example, I may be in the Work Order listing and want to include "Address Line 1" from the Work Order’s Asset in the listing. To locate the field I would follow this process:
- The field is not in the list of standard fields for the listing but instead comes from the Work Order’s Details, so I would scroll through the listing until I locate the "Work Order" heading and expand it. Headings are denoted by a triangular icon to the left of the listing entry. Clicking on the icon expands the heading to display the Work Order’s fields.
- Specifically the Address Line relates to the Work Order’s Asset, so I scroll through the Work Order until I locate the "Asset" heading and expand it.
- I then select the "Address Line 1" field from within the Asset and click on the "->" button to add it to the listing.
To effectively navigate through the available fields requires some understanding of MEX and how information likes to flow between areas.
 The newly added AddressLine1 which has been added and renamed to ‘Address Line’
The limitations of adding non-standard columns are:
- Not every field in the database is available for addition to the listing.
- In order for a field to be available it must have a "one-to-one" relationship with the record being displayed in the listing. For example, in the Work Order listing:
- Each Work Order has a single Asset, so the Asset’s fields can be selected for display in the listing.
- Each Work Order may have many Work Order Spares, so fields from the Work Order’s Spares cannot be included in the listing.
Although Custom Fields can be added to listings it does have a negative effect on the amount of time that it takes a listing to display. To avoid this performance penalty, it is recommended that you use the listing’s Custom View function, although it does require that you have the ability to write SQL queries.
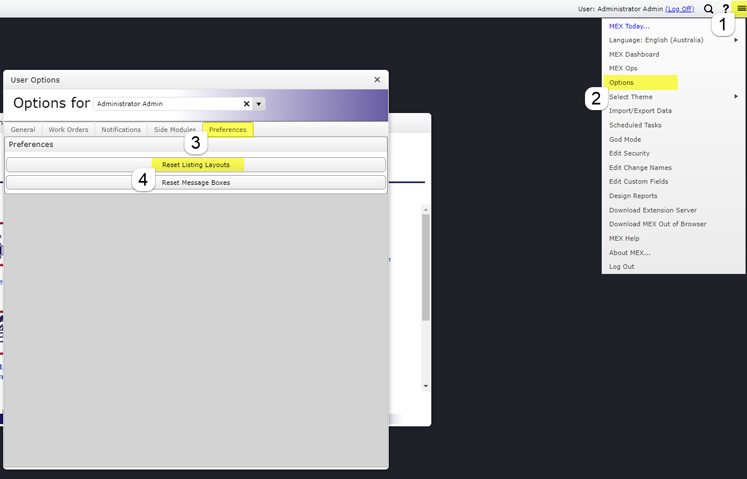
If while you are customising your listing layout you notice that a column has now disappeared or you have shifted the column to the wrong position, don’t worry. All of the Mex Listings can be reset from the user options window.

To reset the listing layouts all we need to do is navigate to the main menu and select options from the drop down in the top right-hand side of Mex. From there you select Preferences then ‘Reset Listing Layouts’.
Selecting the reset listing layout button will reset all of the listings back to the standard layout. Any of the custom columns you have added will be removed but the SQL query will not be removed, this way you can go straight back to adding the columns you want to see.
If you have any questions or experience any difficulty with this feature, then you can contact MEX Support via email at support@mex.com.au or over the phone on +61 7 3392 4777.