Creating an Electronic Form in MEX
Electronic Forms are used on MEX Work Orders and can be filled in and signed on site from any device. Service sheets, calibration sheets, handover forms etc… can all be added to the system as Electronic Forms. On top of that we have merged our existing Permits feature with Electronic forms. Now all forms can be accessed through the documents tab on a Work Order.
We have gone about improving the way Electronic Forms are created in MEX with a new, simple and intuitive design tool. Very similar to creating a smart PDF, MEX has embarked on employing editable fields, making the design process less complicated. Resulting in Forms that are even easier for a user to fill out on a Work Order.
Creating an Electronic Form
Although MEX is provided with a default set of forms, you can also take your existing forms and import them into MEX.
For this example, we will start with a document that we will convert into an Electronic Form. This document will become the background for your form, which you can then add various data-entry fields to.
- Start at the MEX Main Menu and click the Control Files Button
- From here we need to click the Control Files Heading and scroll down to the Form Types option
- Click this to open the Form Types listing
- Here you can see all pre-existing Electronic Forms
- Click the New button on the bottom left of the Form Types Listing to open up a blank Form Details screen ready for you to create a brand-new Electronic Form
- Enter the Name and Description of the form. Let’s say Roof Access and with a description of Required for access onto roof
Preparing the Template File for Importing
Since we are uploading a pre-made template, we will need to import the file into the new form’s details. Do note that the source document selected may be any common document format, including but not exclusive to:
- Word
- Excel
- or PDF
All text, tables, images or any other kind of visual formatting should be added to the document prior to uploading it into the form designer.
Uploading the Template
In our example, we are uploading a word document named Roof Access Permits, which includes some basic text, tables and a company logo that we have pre-formatted.
- Click the Load Template button on the bottom left of the new form type’s details
- Browse to the file’s location on your computer, select it and click open to import the document
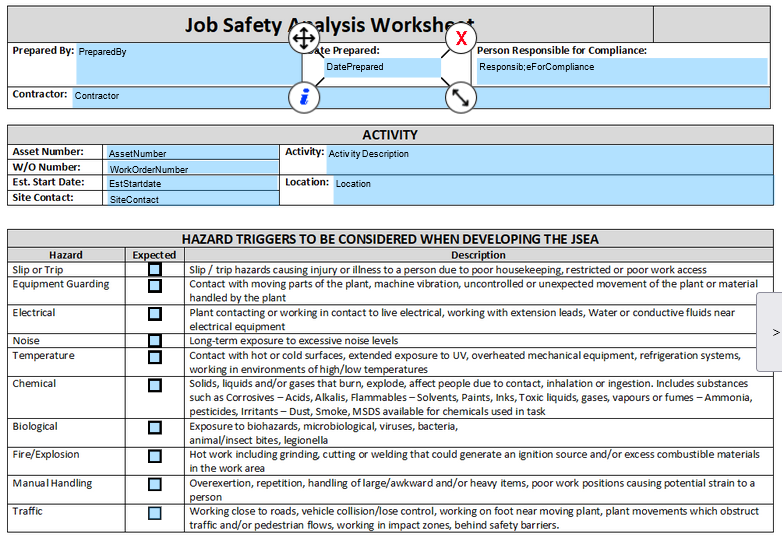
Once this successfully loads, you will be able to see your document on the Form Type Screen. If this includes multiple pages, you can navigate between each page using the arrow buttons on either the left or right-hand side.
Adding Fields and Labels to the Form
Firstly, we want users to be able to freely type into the first two fields.
- Click the Add Field Button, and then click and drag it out to fill out the Location of Proposed Work area.
- Repeat this for the Purpose of Access text area.
- Go through and add fields on the form for all fields that will require entry on them.
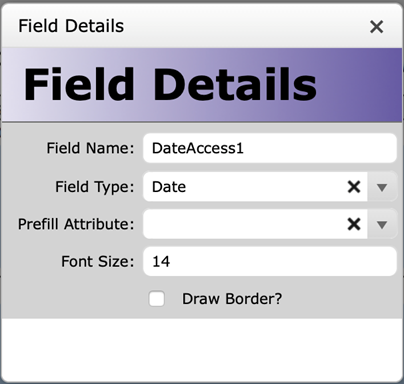
- For fields that require specific data to be entered, we will need to specify this on the field itself, for example a date field.
When you click on each field you will notice four options on each corner of the field.
- To move the field
- To delete the field
- Resize it to your requirements
- And to define the information the field can hold
Click the i option and let’s set a field type of date for this field.
When assigning various labels and fields to the template, you also have the ability to set pre-filled attributes. Such as the Work Order Number that the Form is attached to or the Asset Number or Asset Description of that Work Order – as well as various other fields. In our example, we’re wanting to add the Work Order Number that the form is attached to. As this will be an unchanging field, we can set this one up as a label instead.
As a final example, you can also have pre-defined drop downs for users to select from when creating your Form. These can be customised drop downs defined on the form, or can come from a pre-existing data source in MEX such as a list of Contractors, or Tradesmen. In our example, we are defining a customised dropdown list with the options Employee; Contractor; Visitor;

With what we have covered so far, you can continue over the entire form to slowly create the template that can be then attached to various Work Orders.
This does not stop here however; Electronic Forms allow you to place checkboxes, signature fields and images as desired.
Once you have your Form saved, you can navigate to the Documents tab of any corresponding Work Order and attach the Form. Each Form will also remain saved against the Work Orders for historical purposes, and are ready to print out with all filled in detail at a moment’s notice.
Resizing Fields on your Form
Adjusting the fields on your form is super easy with our electronic form builder.
When you select a field or label, four options will appear with one in each corner.
the option we are after is the resize option in the bottom left, simply click and drag on this button to adjust the field to your desired size.
Add a Form to a Work Order
Now let’s head to the Work Order module from the MEX Main Menu.
- Open up a specific Work Order and browse to and click the Documents Tab
- Click the New Form button on the bottom left-hand side of the Work Orders details and this will open up the Form Type Selector
- Select the form you want to attach to this Work Order and click select to add it to the documents tab. In our case, the brand-new Roof Access Permit.

You can now go through and fill in the details of the form as required. Entering text, adding dates, checking boxes and selecting from drop down menus. You will also notice that the Work Order number has been pre-populated and is unchangeable.
Add a Form to a PM Policy
Electronic Forms can also be assigned to any Preventative Maintenance (PM) Policies as well. Ensuring these forms are added to the Work Orders the schedule will create. If a certain PM has sections of the form that will always be filled in with the same details – you can go into the details of the specific Form on the PM and fill them in. That way, when these are raised into Work Orders, the forms will come automatically attached with all prefilled attributes and data already populated to save your employees time.
That’s pretty much it. Creating Electronic Forms has never been easier.
You can access more information about Electronic Forms by clicking the following link or refer to the MEX User Guide.
As always, if you have any questions our friendly support team are always on the standby to help you out. You can contact them at support@mex.com.au or call +61 7 3392 4777.