
Understanding Asset Movements in MEX
In this tech tip we take a look at the movement of Assets within the MEX Asset Register and how this information is captured and recorded in MEX. When an Asset is relocated to another site, it is advisable to use the Move Asset functionality as opposed to creating a new asset in the new site. That way you ensure that the Asset retains all the maintenance history of that asset.
Moving Assets
There are two ways to go about moving an asset:
- Using the Asset Move option
- Drag and Drop
Let’s take a look at the Asset Move option
Asset Move Option
Moving Assets in MEX is simple and will need to be done inside the MEX Asset Register. Let’s jump in and move an asset:
- Open MEX and go to the Asset Register
- Got through the Asset Tree and locate the Asset that you want to move
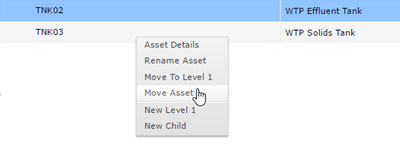
- Next right mouse click that particular Asset and select Move Asset
- In the resulting confirmation screen, click YES
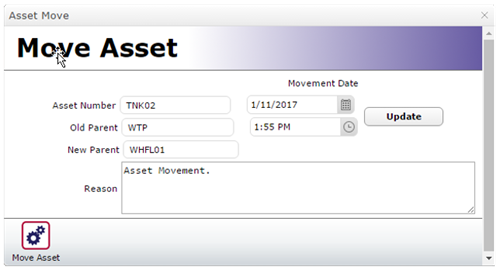
- MEX will now bring up a window to Select Parent Asset. This window lets you pick the next home for your Asset. Just make sure the details are correct and then give it an appropriate Reason if the default ‘Asset Movement’ is not sufficient.
- Click Move Asset to confirm the move.
Drag and Drop
If you would like to simply drag your Asset to its new location and drop it to save it there you will need to firstly ensure that this option has been turned on. Do so by ticking the box Drag and Drop at the bottom of the Asset Register. We do recommend that you use Drag and Drop for short distance movements.

Once this option has been enabled, you will be able to pick up and drag Assets where you want them to go. Similar to how moving documents within your computer works.
Similarly, to moving Assets by using the Asset move option highlighted above, dropping the Asset in its destination will bring up the confirmation screen where you will need to fill in the details of the move and confirm it.
Recorded Movements
With all these confirmation screens, where is all this information recorded and how can I access it?
All asset movement records within MEX are stored with the Movement tab of each Asset. This is a great area to explore and confirm where and when an asset has been used on a particular site, especially for situations where an asset is relocated frequently. For example, a truck moves from your Bundaberg site to your Rockhampton site, MEX users at the Rockhampton site will be able to view work orders and readings linked to this asset and continue to maintain it appropriately and make sure they do not miss any significant usage maintenance.
As you can see here, this particular asset was moved on the 11th of January, after close to 4 years in its old location.

It is advisable that if you do make mistakes when moving assets then record that in the reason of the Assets movement confirmation form.
Renaming Assets
While you were moving assets around, you might have noticed we have a handy dandy Rename Asset option in this context menu. Using this you can easily rename assets if required. For example when you are moving the Asset to another site that already has an asset with the same name. Similar to moving Assets, renaming Assets creates a movement record against this asset.
To Rename an Asset
- Open MEX and go to the Asset Register
- Got through the Asset Tree and locate the Asset that you want to rename
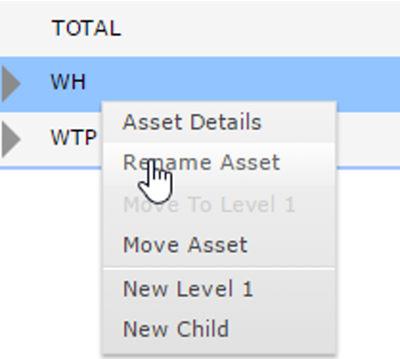
- Right Mouse Click the asset and click the Rename Asset option
- The Rename Asset Form will now appear
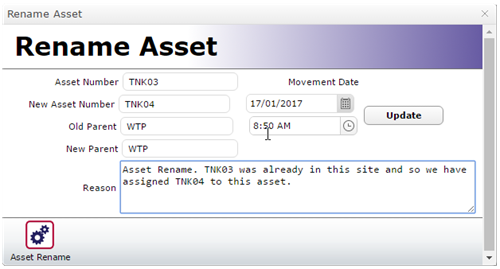
- The first data entry field, Asset Number, shows the current Asset Number that is in your Asset Register.
- The second field, New Asset Number, is where you will enter the proposed name for that Asset.
- Click this field and type in the new Asset Number
- Complete the Reason field to document any important information regarding this change in name.
- If you open up a rename window, the time and date are set to that moment, if you leave it up for a while and require accurate movement data. Click Update before you finish renaming your asset.
- Do note that the Old and New Parent boxes will only be required if you are moving an Asset.
- Click the Asset Rename button at the bottom left hand side of the form to confirm the name change.
- The Asset should now show in the register with its new name
If you want to see where this information, much like moving an asset, open the Asset Movement tab of the asset and you will notice that any name changes are also saved here with the Rename option ticked.

That’s it for Moving Assets!
As always if you have any questions regarding Asset Movements, finding the information or renaming an Asset please contact our support department at support@mex.com.au or call +61 7 3392 4777.