
Where are my Work Orders in MEX
Quite often in support we get calls coming in about missing Work Orders or Preventative Maintenance listings. Chances are that they’re still in the system, but there is either too much on screen to see it, or there is a filter applied and it’s hiding what you actually want to see. The items that show up in a listing can be manipulated using the Range and Filter functions which I will give a brief overview on and explain how each one works.
 Using the ‘Range’ function
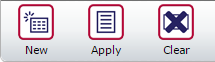
On most listings in MEX, there is the option to ‘range’ the data you’re looking at, this will go through every entry that would normally display and hide anything that doesn’t meet your conditions. The button is located at the very bottom of the listing window and is generally next to Print and Details.
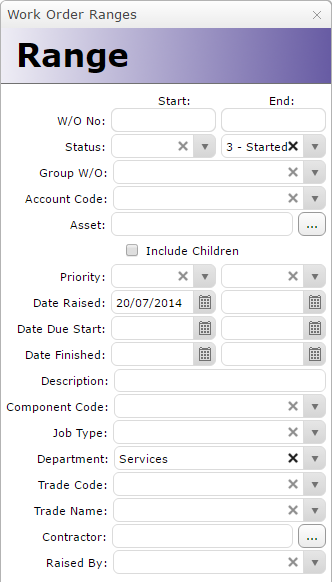
The Range function will differ between listings, but it will generally include the most important fields that you would want to exclude by. In the example shown above, this is the range options for the Work Order Listing.
Using the parameters above, once I click Apply it will return all Work Orders that meet the following conditions:
- The status has a value equal to or less than 3 - Started
- They were raised on 20th July 2014 or later
- They are from the Services department
The range function is great when you want to only show items from a specific category or only see listings located between a start and end value, such as dates or Work Order numbers.
If your listing is currently being filtered by a range, it will say so in the heading of the window by including the expression (Ranged).

To revert the listing back to showing all items, click on the Range button, and then at the bottom of the window, click on Clear and then Apply. This will restore the range parameters back to default and return everything.
If your Work Orders or Preventative Maintenance items still haven’t shown up, don’t worry, there might be a column Filter applied as well!
 Using a Column ‘Filter’
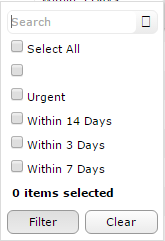
As well as using the Range function, you are also able to filter results on a per column basis. This is useful if you want to hand pick certain parameters that the range isn’t specific enough to narrow down. To use the column filters, all you need to do is find the column you want to add exclusions to and then click on the funnel icon which is shown just next to the column name.
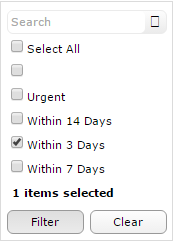
One example of where you might want to use a filter, is to only show Work Orders that are Urgent or Within 3 Days. To do this, un-tick Select All and then re-tick the priorities you only want to see under it. Once you have applied the column filter, your data will be refreshed and only show what the filter allows.
You can also apply multiple filters at one time to further narrow down your results. For example, you can also choose to only show these high priority jobs if they’re from the Mechanical or Electrical department.
![]()
Unlike the Range function which will tell you in the heading that the data has been ranged, the column filters are a little more subtle and it’s something that our customers will occasionally miss. Once a column has a filter applied, the funnel icon will change from empty to being filled in blue.
If you know that more Work Orders should be showing but they just aren’t there, have a quick look at your columns and see if any of them have a little blue funnel next to the column name. If you do find a funnel that’s filled in and want to reset the filter back to normal, click on the funnel to open up the filter menu and then click on Clear Filters for ‘ColumnName’ at the very top. This will reset the filter to Select All and restore the funnel icon to being empty again.
If you still can’t find it after you know you’ve cleared all the filters and ranges, it’s probably time to give MEX Support a cal on +61 7 3392 4777 or email support@mex.com.au