Working with MEX Edit Mode and Custom Fields
Edit Mode is a tool in MEX that allows users to set up security, edit labels, set mandatory fields, view audit logs of changes made to the data in MEX.
Customisation is a big part of the MEX Software, this is why we allow users to build out MEX in a way that suits their company. Customising your MEX System leads to more efficient work and having all the data you need right in front of you.
To access Edit Mode, you must be logged into an Admin account. Accounts assigned to a Security Group are unable to access Edit Mode even if those Security Groups have no restrictions.
Accessing Edit Mode
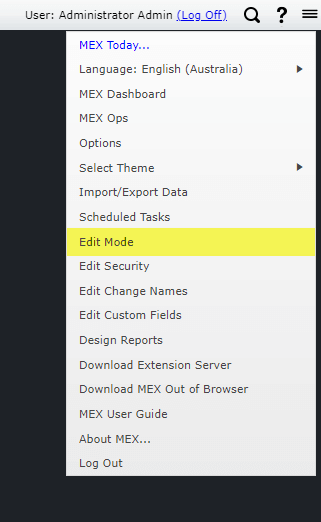
- Select the System Option Menu (hamburger menu) from the top right of the MEX screen.
- Click Edit Mode from the drop-down menu.
- From the Edit Mode window click on Custom Fields
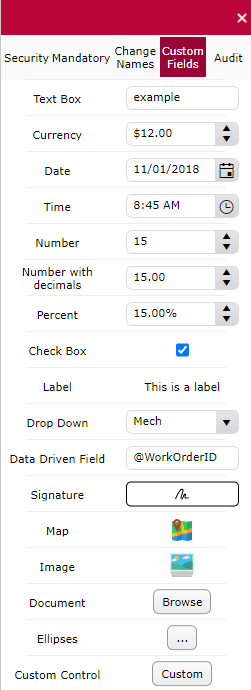
Once you have selected the Custom Fields option you will see all of the types of Custom Fields that can be dragged and dropped into MEX.
The majority of the field types found in MEX can be added as a Custom Field including text fields, drop-downs, date fields, check-boxes etc. There is also the ability to add "Data Derived" fields, which will display a value based on an SQL query that you create for the purpose.
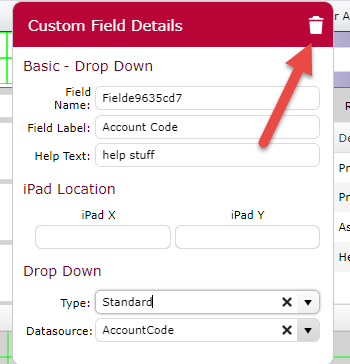
A field is added to the screen by clicking on the appropriate field type in the toolbar and dragging-and-dropping the field onto any position in one of the green grids. Once a field has been dropped onto the grid then a "Custom Field Details" pop-up will be displayed for you to enter the details of your new field into. The type of details that need to be entered for the field will vary depending upon what type of field you are adding.
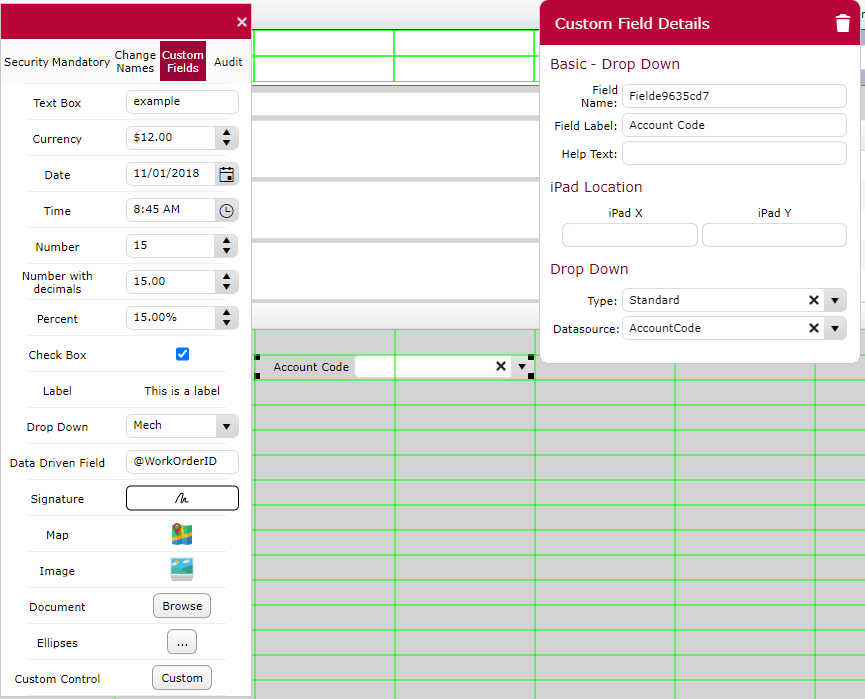
The custom field details screen allows you to set relevant information, such as:
Field Name:
- Field name sets the name of the column in the database so it can be referenced easily when extracting data.
Field Label:
- Field label allows you to set a label beside your field so users know what information is being displayed or what data should be entered in to the field.
Help Text:
- The help text field will show users a small blurb of text to guide the user in to what is being displayed or what they should enter in to the field.
Drop down type:
- Standard – select an existing data source.
- Custom – Semicolon separated list.
- Data driven – Data is pulled via an SQL script.
Drop down Data source:
- This is where you can set what data is available to select from the drop down.
After a field has been added to the screen you can access its details by clicking on the field while you are in the Edit Mode's custom fields function. This will display the Custom Field Details pop-up again so that you may edit it.
The field can be repositioned by using drag-and-dropping it to another point on the green grid.
A custom field is removed from the screen by clicking on the rubbish bin icon in the top right-hand corner of the field's details. Note that when you remove a field you are also deleting all of the information that has been entered into that field.
There is so much more that you can do with custom fields other then drop-down fields.
The MEX user guide details the process of using custom fields: Custom Fields User Guide
For more information about Edit Mode please contact MEX Support at support@mex.com.au or call +61 7 3392 4777